I’m working on a textile interpretation of the scene below, which you will note contains an old, abandoned, saltbox-style house.

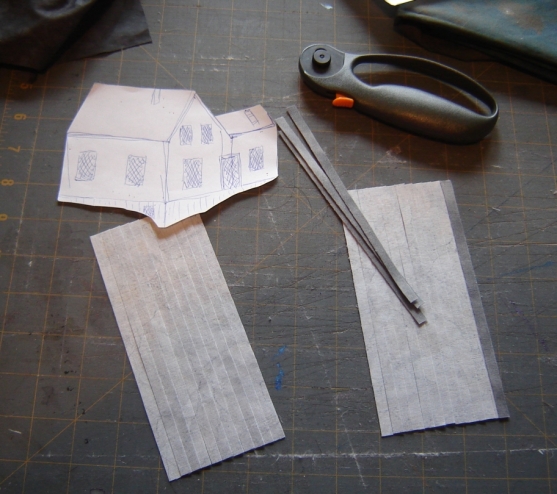
After deciding on the tone, mood and setting in some detail, I started fabric selection and layout. The scene is going to be a night-time setting and I’m tweaking the angles a good bit. To this end I drew and redrew the house until I got a layout I liked (this forms my template for constructing the house – might be a good plan to make a couple of copies, just in case you need to cut one up for pattern pieces):

Thus far, the layouts have been done and I’m finishing off the house, but it occurred to me that it might be helpful to outline a few techniques useful in making a house look like a house, namely, how to simulate clapboarding.
The most obvious is to buy fabric that looks like wood-grain, boards or shingles. I can almost guarantee you, though, that the scale will be wrong for whatever project you’re doing. A variation of this theme is to paint fabric with the appropriate scale, but this will require a proficiency in fabric painting with better-than-average control over the medium. And time. Lots of that. Alternatively, you could take digital pictures of clapboarding, re-size the images to what you need, tint the colour digitally (or paint over after printing) and print the images with colour and light-fast inks directly on the fabric.
Those are the simplest methods, but the results will be somewhat flat. Oh sure, you could quilt the lines of the clapboarding for additional relief, but realistically, it will still look like a piece of flat fabric stitched.
If you’re looking for a more textured effect, you’ll have to actually make fabric clapboarding and put it on. I’ve tried a number of different methods for doing this and have narrowed it down to two that seem to really work.
The first is the accordion method – you take your house fabric and pleat it so that the pleats overlap each other slightly, but give the illusion of layered wood. This method works well for large buildings that are relatively close to you, as the resultant piece of pleated fabric is rather thick and bulky. Iron each fold as you go and pay attention to the distance between folds – it should be relatively even. I’ve often drawn lines on the back of the fabric as fold guidelines.
The second method is the one I’m using for this house. I take two pieces of fabric; one for the shady side of the house and the other lighter piece for the seaward side (water reflects light, remember!). I make sure that I have more than enough of each to entirely cover the house about one and a half times over. Then I fuse the wrong sides together using fusible. The resulting double-sided piece of fabric is then cut into strips. In my case, they were 1/4″ wide:
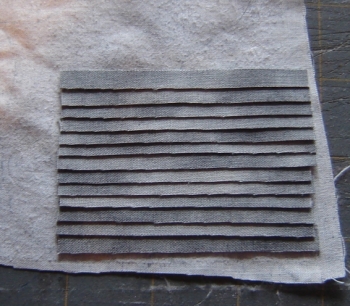
Then I fused another bit of Wonder-Under to a random bit of grey, peeled off the paper and started layering the clapboarding on the fusible-coated fabric in roughly the shape of one of the sides of the house. If you do this on the ironing board on top of a pressing sheet, you won’t have to move the whole, wriggly works afterwards. Things to keep in mind:
- remember which part of the house you’re working on and use the right colour
- pay attention throughout the whole construction process to which is the top of a wall and which is the bottom. Clapboard is designed to shed rain, not catch it….
- lines converge as they get further away, so if your house recedes as you look at it, your clapboard should bunch a bit at one end to give that illusion
- don’t overlap so much that your fusible-coated fabric doesn’t touch the planks
After layering one side, you’ll end up with something like this:
You can then iron it thoroughly to hold it together while you work and trim it to size and shape. When two pieces are done, work on fitting them together. You can see how I’ve laid them over the paper pattern, to check for accuracy:
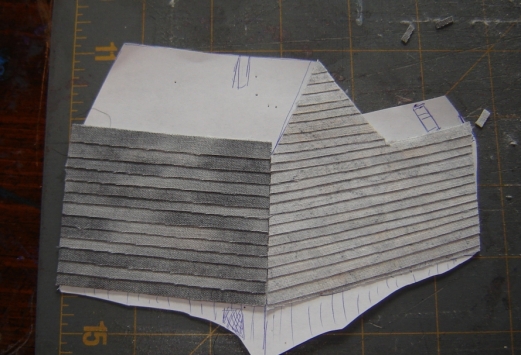
The next step is to cut windows. Before you do this, cut out window templates and lay them over the house pieces to check perspective and angles. Cutting a hole in your house only to find that your lines were off is rather disheartening. Use very sharp, very small scissors and layer some fabric behind the holes to give the desired impression. In my case, since the house is uninhabited, I wanted darkness to convey abandonment. You could also plug in those pieces of wood that hold window panes, should you so desire.

Cut your roof pieces, doors and other bits (you can see in the above picture that I’m working on the foundation planking now). Fit the whole works together and see what you think. This is a critical point, as lapses in perspective often become obvious at this stage. For instance, the door in the above house is slightly off…. must redo that! Also, I forgot a couple of windows and need to decide if they’re worth the anguish of including, since they’re small (and thus finicky).
As for attaching the finished house to the background – I suggest running a very fine seam along the sides of each of the planked sections, to hold things onto the background firmly and possibly outlining the windows and doors similarly. Details can be embroidered, machine-stitched, glued (use good fabric glue that won’t discolour), painted or drawn on. I usually cover the rows of stitching along the corners of the house and around the windows with pieces of fabric that simulate trim on real houses. This means that the shaded side and lit side have fabrics that are different from each other, but which complement their respective sides.
I’ll post pictures when it’s done, which should be tomorrow or the day after.

This is some great ingenuity! Thanks for sharing this.
I’m sitting here with my mouth open – that is SO COOL! Between the clapboarding, the perspective, and that amazing pile of rock, it’s just awesome!
WOW – I’ve been enjoying your tutorials. (I want to do a seascape from my honeymoon in Australia) I am so impressed with the salt box house technique.
Thank you so much for these tutorials – you are very generous with your knowledge and expertise.
These instructions are terrific – thanks!